Every girl or woman, regardless of her age, certainly has a cosmetic bag. It can be different in shape, color and size. But the purchased cosmetic bag does not always suit the owner and then she wants something original. What if you try a cosmetic bag with your own hands? This is a very good idea! And how to do it correctly, this article with a detailed master class will help you.
In contact with
Classmates
How to sew a cosmetic bag with your own hands
 First of all it is necessary decide on the model. There are a huge variety of them. Such a product can be rectangular, oval, round, square, pear-shaped, lip-shaped, pencil-shaped and much more.
Sewing such a product is not difficult, and even very easy and simple. First you need draw a pattern on paper, then transfer it to fabric, and then sew all the parts together. Let's look at some options for patterns and learn how to sew such products with your own hands.
DIY cosmetic bag with a zipper - master class
To make such a cosmetic bag you will need:

Manufacturing stages.

Master class on making a cosmetic bag in the shape of lips
This cosmetic bag is very easy to sew, but looks unusual and original. To sew such a product, you will need:
- Textile;
- Scissors;
- Thread and needle;
- Sewing machine;
- Durable paper;
- A piece of chalk or soap;
- Lightning;
- Pins.
Manufacturing stages:

DIY cosmetic bag made from old denim clothes
Sewing such a product is very simple. To make such a cosmetic bag with your own hands you will need:

Step-by-step master class on making a cosmetic bag with your own hands.

Master class on making leather cosmetics bags
To make such DIY leather goods you will need:

Step-by-step master class on making leather goods.

Content
Many crafters prefer to make most of the things they use with their own hands rather than buy them. Even little things like a cosmetic bag or a wallet are made by craftswomen of their own making. In fact, making a cosmetic bag with your own hands is not at all difficult. It can be of any size, depending on the wishes of its owner, with or without decorations, be intended for going out with all the necessary cosmetics, or used only at home.
Moreover, even a novice needlewoman can make a cosmetic bag with her own hands, because this is one of the simple basic products that does not require a special level of skill, but only a little free time and diligence in work. For example, you can sew a cosmetic bag in the form of a simple rectangular pencil case with one compartment. This is done quickly and easily.
Pencil case-cosmetic bag
To make such a simple cosmetic bag you will need:
- a piece of thick fabric;
- sewing pins;
- tracing paper;
- threads, scissors.
First you need to cut out two identical rectangles from the fabric, which will correspond in size to the area of the future cosmetic bag. They need to be folded with the right sides inward and stitched 1.5-2 cm from each edge, leaving free space inside. A zipper will be sewn in this place. In order for the product to be easily turned right side out, you need to start sewing with the insertion of the lock.

When the edges of the rectangles are sewn together, the fabric can be laid out and the zipper of the future cosmetic bag can be tried on in the middle of the remaining unstitched space in the fabric. The snake is aligned and secured with sewing pins so that it can be stitched easily and correctly.

Before sewing the zipper to the cosmetic bag, you need to put a piece of tracing paper on the other side. This will help align the sewing line and prevent the thread from wagging to the side.

The zipper must be stitched to the fabric along with a piece of tracing paper on the other side.

From the reverse side, the product may look strange and not entirely beautiful, however, when the tracing paper is removed, a neat, even seam line will remain on the front surface of the cosmetic bag. Professional craftswomen often use this trick in handicraft work.

A neatly hidden zipper and an even stitch of thread will please even the most demanding needlewoman.


The next step will be to align the corners of the future cosmetic bag. To do this, you need to measure equal distances from the edge, secure them with a sewing pin and stitch.

It is better to trim off the excess fabric so that it does not take up additional space inside.

Having turned the cosmetic bag right side out, you need to beautifully finish all the seams, hide the threads, and, if necessary, manually hide the visible edges of the zipper.

In the final version, the zipper of the cosmetic bag should be fastened easily and smoothly, and look neat.

A simple cosmetic bag is ready. This option is most suitable for a small amount of cosmetics that you can take with you to work or on a visit, putting it in your bag. A travel cosmetic bag made by yourself does not take up much space, but will keep all the necessary little things in order and in one place.
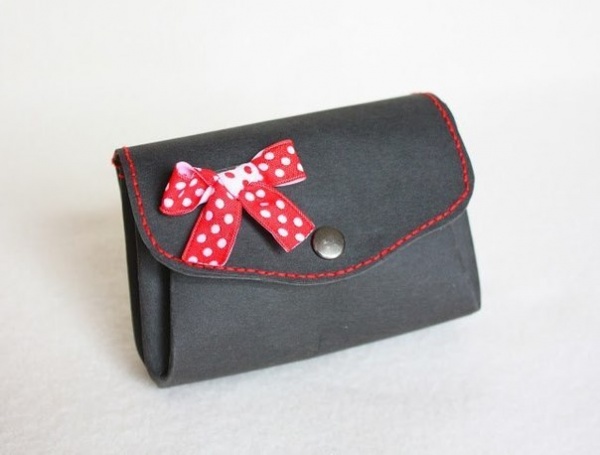
Cosmetic bag with a bow
An ordinary pencil case is easy and quick to make, but it also looks too simple. To make something more sophisticated and beautiful, you need to put in a little more effort. But the result is worth it.
Girls at any age love beautiful things. And if bows and ruffles look unpresentable on the clothes or shoes of an adult woman, then a cosmetic bag is the kind of thing where you can allow yourself to remain a little girl. To sew a fun cosmetic bag with a bow with your own hands, you don’t need the special skills of a professional seamstress. All it takes is a little time and effort.

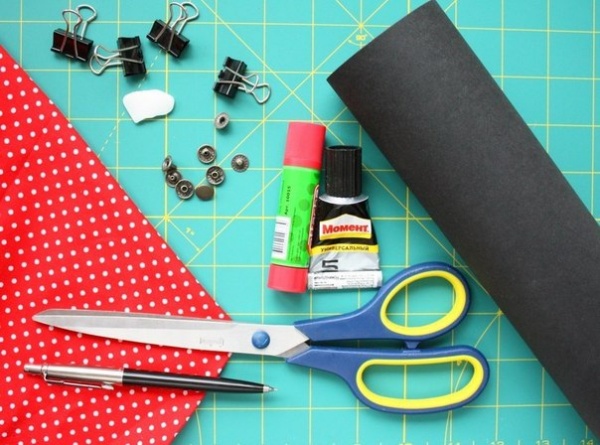
To make such a cosmetic bag with your own hands, you will need to take the following materials:
- thick fabric, you can even use a plain denim piece of fabric;
- thin fabric for lining;
- clamps, scissors;
- glue;
- chalk or pencil for drawing on fabric.
To make such a cosmetic bag with your own hands, you can use ready-made patterns that are printed or redrawn on an A4 sheet.
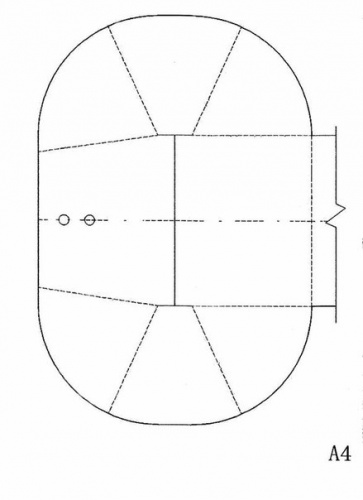
The cosmetic bag will consist of two parts, so it is necessary to make patterns for both patterns.
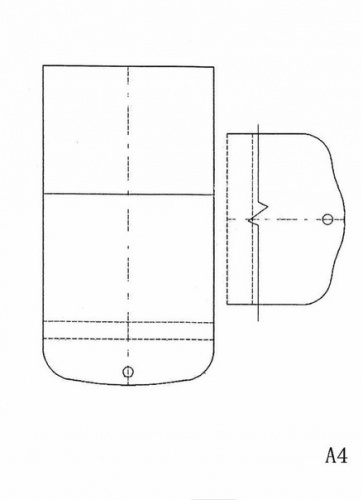
When both patterns are ready, they can be transferred to fabric. This is not difficult to do, since both schemes are quite simple and understandable.
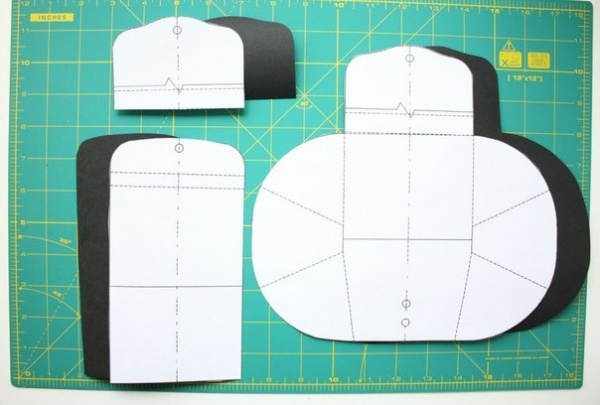
According to the drawn contours, the fabric must be cut accordingly and obtain similar shapes. The patterns need to be transferred to both the lining fabric and the front fabric so that the shapes are the same. At the same time, it is advisable to draw the fold lines of the future cosmetic bag on the lining fabric, so that later it will be easier to fold the finished product.
The pieces of material will be glued together to ensure a secure connection.
At the same moment, when the two layers of the cosmetic bag are fastened together, you need to insert the button. This is done using a special device that securely fixes the button without tearing the edges of the fabric.
The peculiarity of the cosmetic bag is that no stitching materials are used in the work; it will be held in place due to the special design of the fold lines and the button that securely fixes it in the closed state.
The cosmetic bag is ready. All that remains is to glue any bow to it and enjoy the result of your work.
For non-standard girls who prefer to stand out from the crowd, they need a cosmetic bag that catches the eye. Making such a mini-handbag with your own hands is not at all difficult if you follow all the points in the master class and do all the work carefully.
In the shape of a woman's lips
A bright, unusual and unique cosmetic bag, shaped like a woman’s lips, will be an excellent accessory for every fashionista. To sew it yourself does not require a significant investment of time or materials. Once you start, everything will be done quickly and easily.
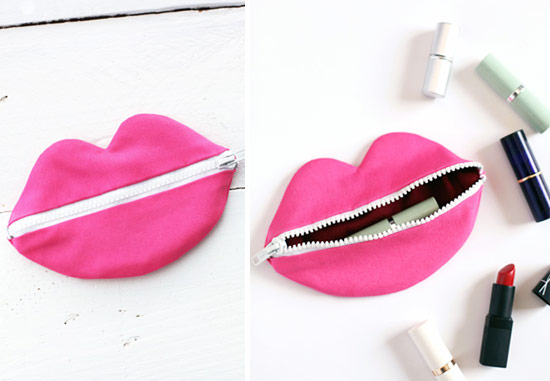
To make a cosmetic bag in the shape of lips, you need to prepare the following materials:
- fabric in two colors, for the front side and lining;
- zipper of the right size;
- scissors, pins, thread.
Sewing sequence.
In the modern world, exclusive handmade things have become increasingly available for use by every person. On the Internet we often come across photos of handmade cosmetic bags. It would seem nothing complicated and not very expensive.
If you are a fan of cutting and sewing, then you, like no one else, know how sometimes it is a pity to throw away scraps of fabric that are left over during the next sewing. I want to make you happy, you don’t need to do this. It’s better to put them to good use and make a cosmetic bag.

The sewing process that we offer is not complicated and will not take much time. But the final result will please you for a long time. After all, something made for yourself cannot be of poor quality.
To work you will need:
- Leaf in a cage
- Simple pencil
- Textile
- Bias edging (trimming)
- Pins
- Scissors
- Lightning
In addition, we will need: a ruler, a sealant (non-woven fabric), a marker, and lurex threads for decoration.

Let's start a master class on sewing a cosmetic bag with your own hands
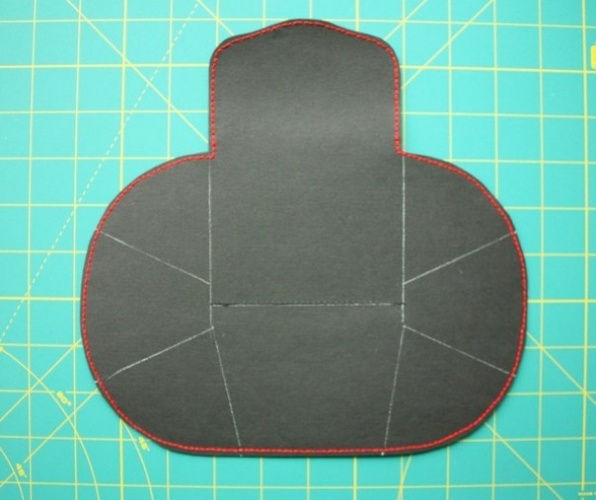
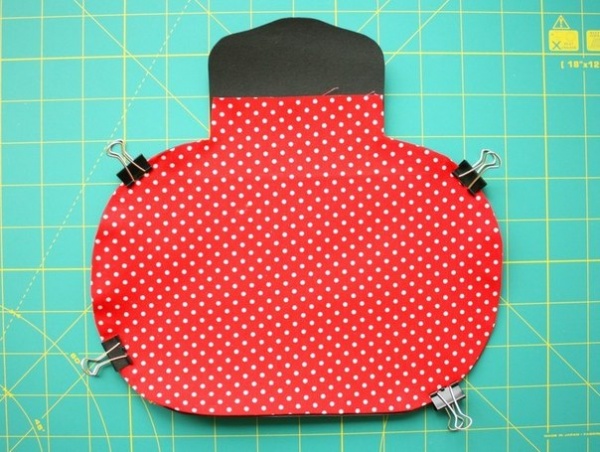
We start working with a pattern, draw it on the prepared sheet and cut it out carefully. Then, using pins, we attach the pattern to the fabric and cut out the blank. Since our cosmetic bag will be monochromatic, we cut out two identical templates.

We strengthen the parts in order to avoid fabric disintegration. To do this, we cut out similar parts from cotton and sew them together, departing from the cuts by about three mm. We fold the received parts of the future cosmetic bag with the wrong sides and sew them together. The finished part must be ironed.
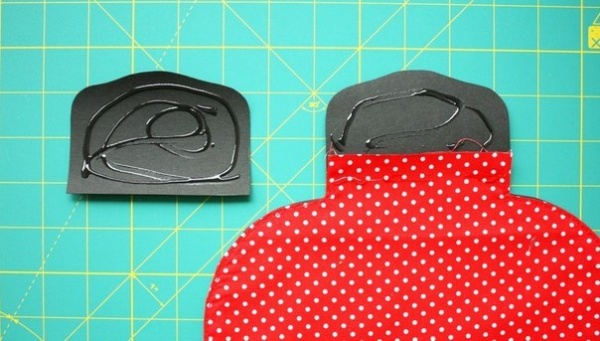
Then, using a machine, lay a decorative stitch that runs down the middle of the cosmetic bag, do not forget that the cosmetic bag must be positioned with the front side up.

We hide open sections using bias edging. Pay special attention to the rounded areas, making sure that the needle accurately grips the binding. For the best effect, pin the trim to the cosmetic bag in advance using pins or baste in advance with a simple stitch. Then cut off the excess trim and tack it.

Place the pieces right side in and measure nine mm upward from the fold, mark and pin on both sides. Sew the seams closer to the edge, do not forget to tack.

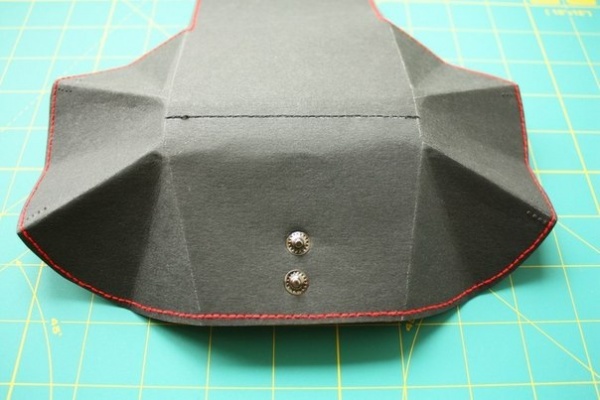
We measure two and a half centimeters from the edge and mark it with a line. The size of the cosmetic bag you make will depend on this, so be careful and measure everything carefully. We fasten the corners of the cosmetic bag with a seam in both directions. Next, baste the fastener.


For the size of the cosmetic bag that is described in this process, a zipper with a length of twenty-five centimeters was suitable. You need to finish sewing with a decorative stitch located at the very edge. A brand new cosmetic bag is in your hands!
You can choose a pattern for your future cosmetic bag according to your taste. It can be either round or square, it all depends only on your taste and imagination.

Try to strengthen the external parts as best as possible, then the cosmetic bag will serve you for a long time. Use non-woven fabric whose properties are suitable for the fabric you have chosen for sewing.
Decorate it with rhinestones, beads, ribbons and other decorations, then your cosmetic bag will not be simple and inconspicuous, but bright and individual. It is by decorating your cosmetic bag that you can show your imagination.

Lay out a pattern using rhinestones, or embroider your name with beads, in any case it will turn out exclusive. And, perhaps, after some time, all your friends will line up to become the owner of an exclusive cosmetic bag that you will personally make.
If you find a zipper larger than you need, don't worry. After you sew it to the cosmetic bag, trim off the excess and cover the resulting cut with tape. The appearance will not suffer from this.

Using this pattern, you can sew a cosmetic bag with your own hands from a variety of materials (jeans, leather, etc.). Don’t be afraid to experiment; perhaps making cosmetic bags is your calling.


Photo of a handmade cosmetic bag


Every woman and girl knows: you can never have too many cosmetic bags and handbags! There is a good opportunity to please yourself or your daughter - a make-up bag with your own hands. Cosmetic bag master class with images of cats - all options are interesting. We have also selected options for patterns for, and an organizer with images of cats.
How to sew a cosmetic bag? It’s very simple - every lady always has pieces of fabric in her house: cotton, linen, or pieces of old jeans. All that remains is to take a pencil, a ruler, and a small zipper, and cut out the blank. We’ll tell you how to sew a cosmetic bag with your own hands using patterns in the master classes. It is more convenient to sew such a product by hand, but if you are more comfortable using a sewing machine, it’s your choice.
A simple cosmetic bag made of fabric with a “cat” block will appeal to everyone, without exception. Can be used as a travel cosmetic bag, and as an organizer for various small items. You can take absolutely any sizes. It is better to choose a thicker fabric; denim fabric is well suited for such products.

This is what a DIY cosmetic bag looks like from the side. Sewing a bag in a patchwork style is not a difficult job, the main thing is to do everything carefully, take your time, and make sure that the seams are even.

For the master class you will need:
- Small pieces of fabric.
- Black beads for eyes.
- Lightning.
- Scissors, pencil,
- Iron for smoothing patches.
- Tailor's pins.
- A piece of padding polyester.
- The edging is a strip 2.5 cm wide.
How to sew a cosmetic bag with your own hands using patterns:

First, let's collect yellow ones). We put all 7 patches together, stitch them, and smooth the seams with an iron.

This is what it should look like.


We take a ruler and a pencil, and draw a line on the front of the product along which we will quilt the completed fragment. We put the padding down, then the lining, and pin it together. We sweep 3 parts of the cosmetic bag along the edge. We quilt the top of the product, the padding polyester, and the lining.

Fold the edging tape and the top of the cosmetic bag, right to front. We pin the edging. The finished width of the edging is 0.8 cm. Leave a small tail 2-2.5 cm from the start of sewing the edging. Next, having reached almost the end, we place one end of the tape on the other.

Carefully bend the edges and trim them so that the edging is the same width everywhere. We sew with hidden stitches.


Fold a triangle for the bottom of the product. The width of the lower part is 6 cm. Turn it right side out and sew in a zipper. Don't forget beaded eyes and a piece of lace ribbon. All is ready.

Such a small round cosmetic bag can be sewn without a sewing machine, by hand, since a blind stitch is mainly used here. Let's take a look at a DIY cosmetics bag masterclass.

To work you will need:
- Main fabric (linen, cotton, denim).
- A piece of fabric for lining.
- Lightning.
- PVA glue.
- Sintepon.
- Rep ribbon matching the color of the cosmetic bag.
Round blank. The master class used a blank 7.5 cm in diameter. You can use tin lids from glass jars.

First, we will cut out a round part from padding polyester; it should be slightly larger than the round blank. Spread the workpiece with PVA glue and glue it to the padding polyester.


Then we tighten the thread and secure it with several stitches.

With the second part we do the same as with the first. Take the zipper and secure the ends with a few stitches. Take a small piece of the main fabric and iron it as you see in the photo:

Then you need to sew this part to the beginning of the zipper. This can be done by machine or by hand.


We will sew the main plan detail with a zipper using hand blind stitches. We sew along the entire circumference of the cosmetic bag. Cut off the excess length of the zipper.

For convenience, you need to make a small loop from a piece of tape. We put this loop between the zipper and our small piece made of the main fabric.


That's all. The product is ready.


Using the same principle, you can make these cosmetic bags with cats. These cosmetic bags can be made from old jeans. If you sew handles to the case, you will get a small handbag for a girl or a cosmetic bag from old jeans. You just need to sew in a zipper.


Another pattern for a cosmetic bag. DIY cosmetic bag made from jeans. Enlarge the picture, product size 18/12 cm.

This is such a cute cosmetic bag, more like one made from any thick fabric in one evening.


This convenient organizer in the shape of a cat will be useful for any needlewoman. Now you have a place where you can put various handicrafts.

To work you will need:
- Thick fabric.
- Scissors.
- Buttons, button.
- Sewing machine.
- A piece of cord.
Draw the pattern on paper, then transfer it to the fabric.

The main and lining fabric should be cut out, as well as small pieces of fabric for filling the organizer.

You can sew the front side from a whole piece of fabric, or from two halves.

Which of the girls is not familiar with the situation: as always, at the right moment, nothing can be found in the bag! And the necessary thing, according to the law of meanness, does not come to hand. We know what needs to be done: sew a comfortable cosmetic bag! DIY cosmetic bag: depending on the fabric and complexity of the pattern, this work will only take you one evening. In order to sew cosmetic bags with your own hands, you do not need to have a sewing machine - everything can be done by hand, using a needle-forward stitch. If you sew carefully, no one will notice the difference.
First, we sew a cosmetic bag with a zipper - the master class is very simple. There are 2 cosmetic bags in the photo: a large one and a smaller one. We will sew the smaller one. In addition to storing cosmetics, it can also be used by a woman as a wallet - you can keep small bills in it. There is no need for a pattern here; the dimensions of the cosmetic bag are 23 cm wide and 14 cm high.

To work you will need:
- Pieces of main fabric with roses 13/14 cm - 2 pcs.
- Striped fabric scraps 6/14 cm - 4 pcs.
- Lining fabric - 25/28 cm.
- Sintepon - 25/28 cm. (If the lining is thick, then sew without padding).
- Lightning.
- Rep ribbon - 12 cm.
- Tailor's pins.
- Ruler, pencil, scissors.
- Ring for decoration.

We prepared the shreds and lining and cut the grosgrain ribbon into 3 parts.

On the front side of the main part with a rose, we place 2 striped parts on both sides, right to front. We sew it on a machine or sew it on by hand. We bend the seams towards the striped parts and iron them.

If you work on a machine, make a finishing stitch 0.5 cm from stitching the scraps (seen in the photo below).

Next, we need to process the ends of the zipper with grosgrain tape. To do this, fold 2 pieces of tape in half, apply them to the front side of the zipper and pin them together. Then we put the zipper on the front part of the cosmetic bag and also pin it along its entire length.

We first sew the zipper on one side, then unzip it and sew the second part of the zipper to the second half of the cosmetic bag. For beauty, you can decorate the zipper with finishing stitching.

We thread the third part of the grosgrain ribbon into the ring, then pin it with a pin at a distance of 1.5 cm from the finishing stitch.

We continue sewing cosmetic bags. Turn it inside out, align it, and pin the sides with pins. Sew all 3 sides of the cosmetic bag. Seam width 1 cm.

If you decide to make a product with padding polyester, then it is advisable to sew it to the lining so that it does not bunch up.

Sew the side parts of the lining. We turn the lining onto the face, bend the top edge 1 cm, and press with an iron. We put the lining inside the product. We pin and hem by hand using a blind stitch.

That's all. If you increase the size of the product, it will become larger - it will become a travel cosmetic bag. A cosmetic bag can be made with several compartments if, when stitching the sides of the lining, you insert another 13/13 cm flap.
Lately, accessories in the shape of animals have become especially popular, for example, in the form of this cute baby elephant. Our master class will tell you how to make a cosmetic bag with a baby elephant.

The elephant can be leather or felt. The pattern can be drawn by hand. Choose any one. It is important that the base of the elephant is at least 30 cm in size. After cutting out the elephant itself, you can estimate the folds on the base, and taking this into account, cut out the round base itself on which the elephant will be sewn. The diameter of the base is equal to the bottom cut of the elephant. Next, we outline the cutout for the zipper. One more detail: in addition to the two parts, you must cut out the oval of the ear, which later needs to be glued or sewn to the main ear.

The pattern made from white paper is not entirely successful; from it you can only take the oval of the base. This pattern will be more precise than the previous one:


To work you will need:
- A piece of felt, leather, corduroy or suede.
- Zipper.
- 2 beads.
- Tailor's pins, scissors, needle, thread in the color of an elephant.
Draw a pattern of the desired size on paper. If you want to make a product from corduroy or denim, then you will have to use adhesive interlining or dublerin to give the shape.

We make an incision on the back in order to insert a zipper. If you are making an elephant from fabric, treat the zipper with a facing so that the fabric does not spill out.

We process the zipper in the same way as a “framed” pocket: on the front side of the product we put a piece of lining, 7-8 cm wide and longer than the zipper. We pin it with pins. We mark with chalk a “frame” 1 cm wide and slightly less than the length of the zipper. We draw a “frame” along our line. Cut it like this, along with the main fabric, making triangular cuts in the corners.

We remove all our lining fabric inside, iron it, and go over the “frame” on a typewriter or manually, straightening the “edging” of the lining with a width of 0.2 mm. We pin the zipper and stitch it, we will get a neatly finished edge.

We sew the “trunk” and sides of the elephant. Sew the folds with a tack.

Glue or sew the “inner” ears to the ears. We sew up the holes that we have left.

We pin it together and then sew on the base oval.

That's all. The elephant is ready. You can sew beads instead of eyes, or you can embroider it with colored threads in an ethnic style. Elephants bring good luck.

How to sew a cosmetic bag with your own hands? Another option for a cosmetic bag in the shape of an elephant. Make a zipper on the back, and you can decorate it with buttons, ribbons, bows, and so on.


How to make an unusual and cool cosmetic bag? You can sew round or voluminous, square or in the shape of animals. Here are just a few models: a wallet, a chest, a small bag - all of them with simple patterns.


